
Bee Bee, better known as Honey Bee Sweets, is a mother, home baker and popular blogger. She has agreed to share with Weekender a series of recipes.

We find out more about Bee Bee’s background and glean some food blogging tips from her. Look out for the recipe below.
How did you start baking?
I started when I decided to bake my younger (then three-year-old) daughter’s birthday cake. It was an A-shaped cake, which took quite a while to plan and design how to go about making it. I felt that I needed to document it, since it’s not every day that one bakes a letter-shaped cake.
At that time, I’d been reading food blogs and I thought, sharing my baking method might benefit someone who’s planning to do the same. Thus, my first blogpost was born, and there was no turning back.
What did you do before you became a stay-at-home parent and started blogging?
I was a software engineer working in a hand-held device company in the States.
How do you balance blogging and being a stay-at-home parent?
Actually, it can be quite a challenge sometimes. With daily house matters, keeping up with the children’s busy school schedule, helping with school work, cooking daily meals, baking and chauffeuring the family around… I would usually stay up late at night to type out my posts while the family is fast asleep.
It can be pretty tiring but I guess so long as my passion is there, I’ll try to keep it going.
What inspires you to Blog about such varied kinds of food?
I love food in general and really got inspired when I read up all the cookbooks and food blogs. Furthermore, when I was staying in California, I got to taste more authentic food from other ethnic groups or countries, like Vietnamese, Thai, Indian and even Mexican.
After coming back to Singapore, I try to incorporate new recipes (of different ethnicities) into my daily meals so my family can enjoy them as well.
We love your signature photo-style, shooting flat and using your hands in the photos. What inspired you to do that?
I feel, having hands in the photo brings more realism and life to it.
Do you consider how something will look before you make it?
All the time! I usually picture the food in my mind first… even how it should be plated.
Any advice for others interested in food blogging?
Follow through and be committed to it. Be responsible for what you put up for your readers to read. Do it because of the passion and the willingness to share. Be different!

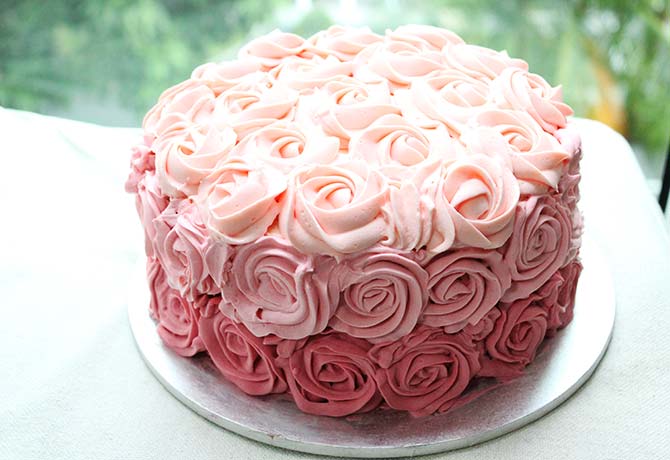
Recipe for Red Velvet & Cheesecake with Pink Ombré Roses
This modified red velvet cake with a light cheesecake layer, complete with piped pink roses, is a beautiful cake for any celebration.
This Red Velvet & Cheesecake with Pink Ombré Roses might look simple but little did I know piping the roses on the side of the cake could be so difficult, especially if one doesn’t get the right piping tip or if the consistency of the cream is not right. I had to redo a few times until I got it right.
Still, I was very happy about how the cake turned out. Adding a light cheddar cheesecake layer in the middle was one the best ideas for making this because the light, soft and slightly-salty cheddar cake made the taste so well balanced.
The red velvet cake recipe is none other than Martha Stewart’s. I’ve made this twice and it was very well received.
The cake was moist, creamy and incredibly delicious. Everyone, even my brother-in-law who doesn’t fancy cakes, said it’s very good. My mum (for whom I made the cake) loved it too and polished off her slice pretty fast!
INGREDIENTS
[su_row]
[su_column size=”1/2″]
For Red Velvet Cake (makes 2” x 8” round cake)
- 285g Cake Flour, sifted
- 1 tbsp Unsweetened Dutch-processed Cocoa Powder
- 1 tsp Salt
- 180g Sugar
- 365ml Vegetable Oil
- 2 Large Eggs, room temperature
- ½ tsp Red Gel-paste Food Colouring
- 1 tsp Pure Vanilla Extract
- 1 cup Buttermilk
- 1 tsp Baking Soda
- 2 tsp Distilled White Vinegar
[/su_column]
[su_column size=”1/2″]
For Cream Cheese Frosting
- 340g Cream Cheese
- 227g Unsalted Butter, softened, room temperature
- 200g-225g Confectioner’s Sugar
- 1 tsp Pure Vanilla Extract
[/su_column]
[/su_row]
Note: I doubled the recipe since it was a three-layer cake plus roses to pipe, but I’m posting only one portion for easier reference.
METHOD
For Red Velvet Cake
- Preheat oven to 170 degrees. Line and grease two 8” round cake pans. Whisk together cake flour, cocoa and salt.
- With an electric mixer on medium-high speed, whisk together sugar and oil until combined. Add eggs, one at a time, beating until each is incorporated, scraping down the sides of the bowl as needed. Mix in food colouring and vanilla.
- Reduce the speed to low. Add flour mixture in three batches, alternating with two additions of buttermilk, and whisking well after each. Stir together the baking soda and vinegar in a small bowl (it will foam); add mixture to the batter, and mix on medium speed for 10 sec.
- Divide the batter equally between the two cake pans. Bake, rotating tins halfway through, until a cake tester inserted in the centre comes out clean, in about 30 min.
For Assembly & Cream Cheese Frosting
- Beat butter and cream cheese with a mixer on medium-high speed until fluffy, for about 2 to 3 min. Reduce speed to low. Add sugar, one cup at a time, and then vanilla; mix until smooth.
- To assemble, place one red velvet cake as the base and spread some cream cheese frosting over. Top it with the cheddar cheese cake. Then spread some cream cheese frosting on top and lastly top it off with the second layer of red velvet.
- Ice the whole cake with a thin coat of the frosting and chill it. Once chilled, decorate as you desire. If you wish to pipe roses, try using Wilton’s 1M or 2D piping tips. Also use Wilton’s food colouring gel to tint the frosting. Remember, from the lightest to the strongest shade.
By HoneyBeeSweets
ADVERTISEMENTS